Looking for a side hustle to make money online using your creative skills? If you are addicted to organization and productivity, then selling digital planners on Etsy is for you! In this post, I’ll walk you through a simple 5-step guide that will teach you not only how to sell digital planners on Etsy but also how to list a digital planner on Etsy to get your first sales faster. Let’s get into it!
SHARE AND SAVE THIS PIN TO READ IT LATER:

DISCLAIMER
This post may contain affiliate links, which means I’ll receive a commission if you purchase through my links, at NO extra cost to you. Read my Disclaimer for more information. Hope you find this post useful!
How To Sell Digital Planners On Etsy
Digital planners are all the rage on Etsy now.
But what’s all the fuzz about?
Digital planners are sustainable and highly customizable, you can take them with you wherever you go saving space in your bag, and there are PLENTY of options to choose from!
Plus, they are cheaper than paper planners and it’s easy to erase/add info to them.
Due to all these perks, selling digital planners online is a no-brainer for any person looking to earn extra cash every month.
Now, you might be wondering where to sell digital planners.
Etsy, with more than 462.1 million visits per month, is a great marketplace to get started!
Let’s find out then how to sell digital planners on Etsy and get your first sales on the platform:
1. Define What Planners To Sell
2. Create Your Niche Digital Planner
3. Make Your First Listing on Etsy
4. Get As Many Eyeballs As Possible On Your Planner
5. Start An E-mail List
Define What Planners To Sell
Picture this: you are so excited; you’ve designed a beautiful digital planner, you’ve opened your Etsy shop and launched it at last.
And then…Days, weeks, MONTHS go by and nothing happens. You just hear…Crickets.
This happens to lots of aspiring sellers who fail to do market research before creating an Etsy digital planner.
And it makes sense.
No one is going to buy your product if no one is searching for it!
That’s why it’s vital that you take your time and study the market in which you’ll be competing to come up with a winning product.
You don’t have to reinvent the wheel. You just need to either identify the top digital planners on Etsy and improve them or create products for untapped niches.
How To Do Market Research
It’s time to see what kind of digital planner you can create by studying Etsy’s search results.
To do this, you can use the free version of eRank, one of the best Etsy SEO and keyword research tools out there.
Go to eRank and type ‘digital planner’ on the search bar.
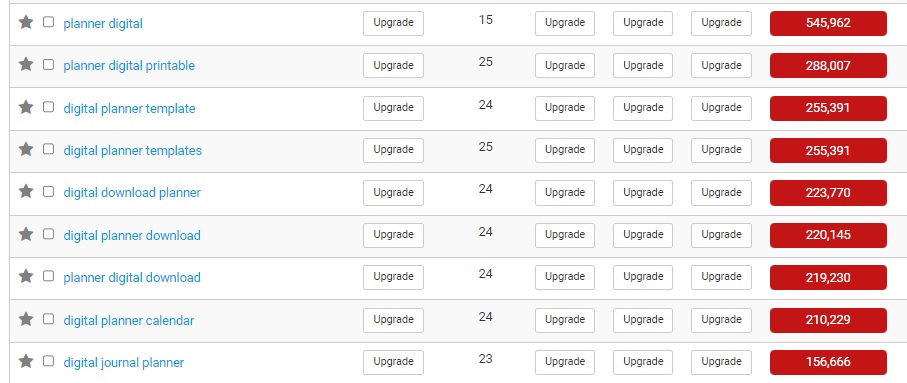
eRank will show key data, like average searches and the level of competition of the keyword.
What you will focus on is the related keywords.
On the first page, the level of competition of the related keywords is huge (red color); this is because these keywords are very popular and there’s almost no chance that your product will rank.
So then I went to page 22 and discovered products with low competition (green color).
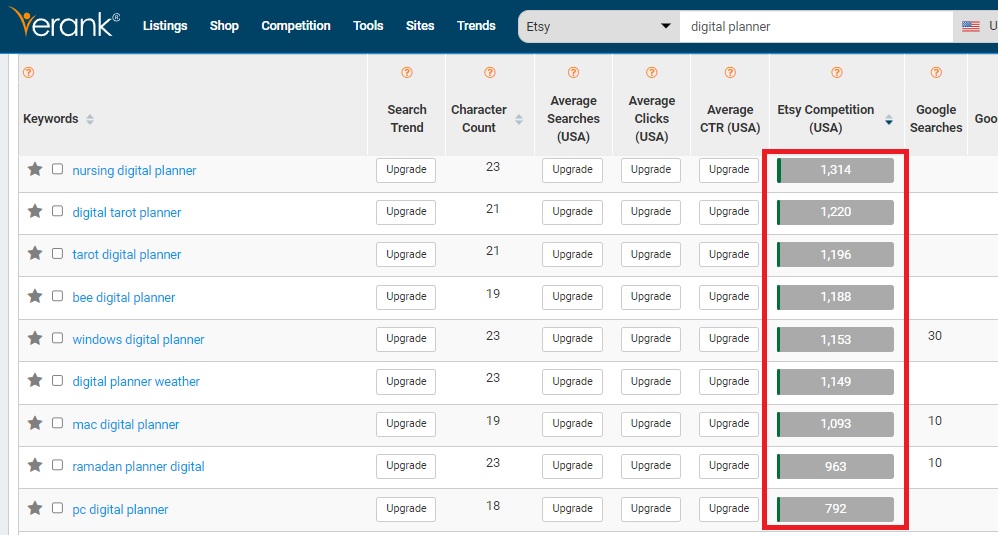
Look for products with a level of competition between 2,000-0.
For example, you can see that ‘nursing digital planner’, ‘tarot digital planner’, and ‘ramadan digital planner’ have low competition, so they’re great options to explore on Etsy!
What you will do now is go to Etsy and see what products come up after typing these keywords in Etsy’s search bar.
Analyzing Your Competitors
Now that you know exactly what niche to pick and work on, it’s time to analyze the products that are already available in the market.
Let’s suppose we pick the option ‘nursing digital planner’.
Enter the keyword in Etsy’s search bar and see what products come up.
Focus on best sellers. You can access them by clicking on ‘All Filters’ ► ‘Star seller’ and replacing ‘star’ with ‘best’ in the URL.
During your analysis, reply to the following questions:
- How are the aesthetics?
- How is it designed?
- How many pages do the planners have?
- What sections do they feature?
- What color palette is predominant?
- What type of font is used?
- Are they complete? Is there something missing?
- What can be added or improved to design the perfect nursing digital planner?
When looking for improvements, analyze the product’s reviews too.
They are a mine of GOLD when it comes to realizing what’s working and what’s not for the product.
Pay a lot of attention to what customers are saying about the brand (including customer service) to design your own planner.
Look at these reviews I screenshot:
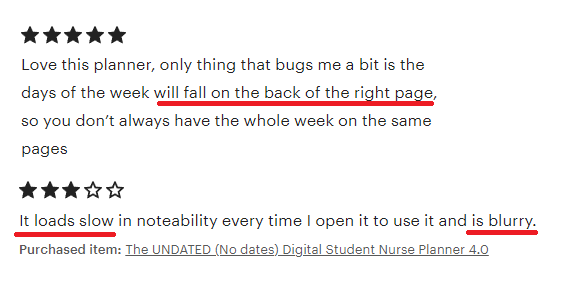
Taking these reviews as examples, you can get improvement ideas to design your own product:
– Images should be high-quality.
– Days of weeks should fall on the same page.
– Your planner should load fast in popular note-taking apps.
Doing your market research is time-consuming but so worth it.
This is the only way to come up with a product that not only has its own differentiators but also solves customers’ problems like no one else!
RELATED POSTS:
- How To Get Your First Sale On Etsy With +30 Amazing Tips And Tricks
- How To Sell Candles On Etsy 2024 [And Quit Your 9-5 Job!]
- How To Sell Low Content Books On Etsy [The Laziest Way]
Create Your Niche Digital Planner
Now it’s the fun part!: designing your digital planner based on all the information gathered during your market research.
But, as a total beginner, you might be asking yourself: ‘What app can I use to create digital planners to sell on Etsy?’
Don’t worry; I’ve got you, girl.
To create your digital planner, you can use two popular design apps for non-designers: Canva and Planify Pro.
Canva
If you want to know how to sell Canva planners on Etsy, let me tell you that this tool is a lifesaver if you are in a rush and don’t have any design skills.
Canva is a design tool that helps anyone make beautiful presentations, social media posts, logos, posters, and more thanks to its wide variety of free graphic elements, fonts, photos, videos, and made-for-you templates that you can easily customize with a few clicks.
For digital planners specifically, Canva offers different templates that you customize and mix to create your unique digital planner.
First, go to Canva.com and in the top menu click on the button ‘Create a design’. Then type ‘Planner’.
On the left side of the editor page, you’ll see that there are lots of templates to choose from (you can use them or start from scratch):
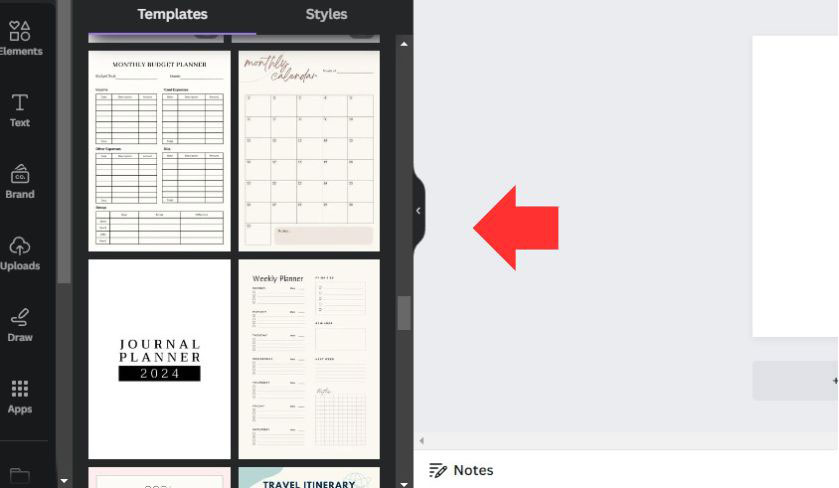
You can customize the graphic elements, the texts, the fonts, and the colors as well as add new text boxes, illustrations, and photos by dragging and dropping them onto the page.
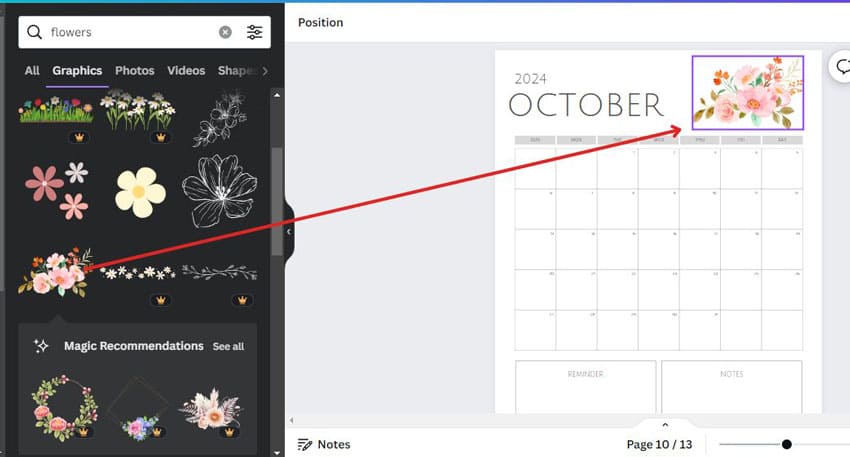
If you need to add new sections, just simply click on ‘+ Add Page‘ and then you can choose the next template.
You’ll see that you can combine all elements available in infinite ways: just focus on experimenting and playing with the features to design the planner you have in mind.
Just take into account that people searching for digital planners like to have all tags on the right side of the planner linked to the corresponding sections.
For example, if you use a square shape to add a month tag named ‘Feb’, the user must be able to click on the tag and be redirected to the section of the planner that corresponds to the month of February.
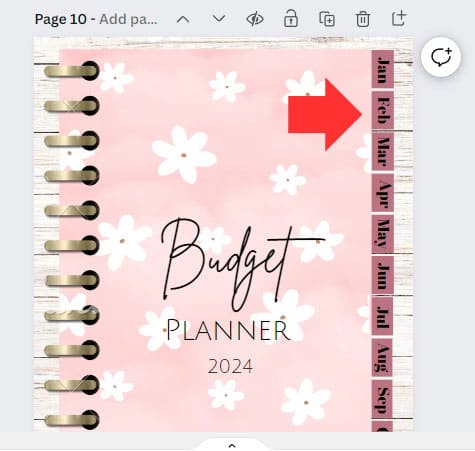
To do that, first, name the page to which the person will be redirected.
In this case, the user will be redirected to the section corresponding to the month of February.
So I name the page for the month of February ‘Feb’.
Then I return to the tag, double-click on the text ‘Feb’, and click on the link icon.
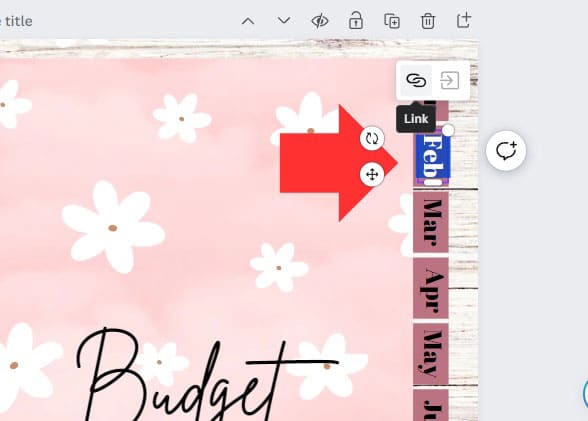
Then I type the name of the page I named previously and voilá! The hyperlink is ready to be used (you will notice that the tag now is underlined, which means it has a link).
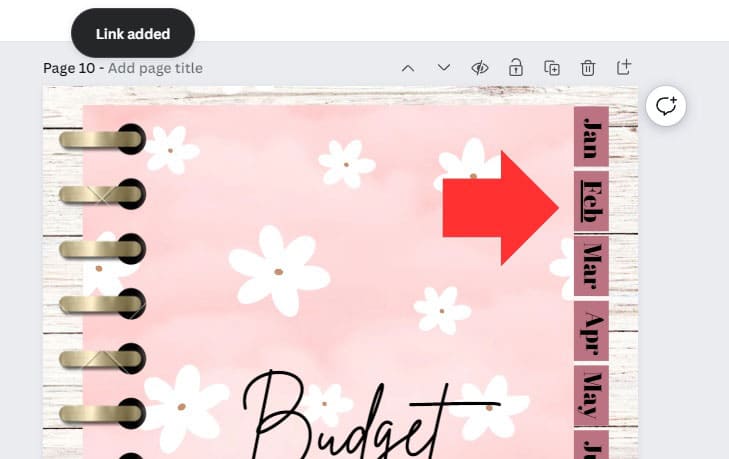
Once you are happy with your design, download it as PDF Print by clicking on the button ‘Share’ ► ‘Download’ ► ‘File type’ ► ‘PDF Print’ ► ‘Download’.
Done!
As you can see, Canva is very user-friendly.
However, there’s a tool that is 10X better for designing digital planners: Planify Pro!
Planify Pro
Planify Pro, unlike Canva, is a tool specifically designed to create digital and physical planners.
I tell you why I’m obsessed with this tool:
- It offers more templates than Canva (+5,000!)
- It automatically resizes your planner, including all layouts, fonts, and graphic elements (you don’t have to do it manually as in Canva).
- It offers templates that already include hyperlinks.
- The personalization of sections is INSANE: you get to include to-do lists, notes, calendars, trackers, and more widgets in any part of the page and change the layout automatically, with a few clicks.
Let’s create your planner!
First, create your account here and get the commercial license.
This is a crucial step to be able to sell your designs and avoid legal issues.
It’s only $19.99 and it’s totally worth it if you are going to create lots of planners!
After getting your commercial license, you can work on your design.
This video by Planify Pro shows you exactly how to create your first digital planner using a template.
Once your design is ready, download it as PDF by clicking on the button ‘Save/export’ ► ‘Digital’ ► ‘Double page’ (or ‘Single page’ if you want) ► ‘Do not rearrange’ ► ‘Sync all pages before export’ (if it has hyperlinks) ► ‘Batch generate PDF’.
Create Your First Listing on Etsy
Opening And Naming Your Shop
Now that your planner it’s ready, it’s time to create your first listing on Etsy.
Go to Etsy.com and sign up.
Then go to the profile icon ► Sell on Etsy ► Get Started ► Let’s do this and reply to the questions to know more about you ► Start your shop.
After choosing the language, shop country, and shop currency, you have to name your shop.
No ideas? Don’t worry; here are some useful guidelines to craft the perfect shop name:
- Don’t overcomplicate it: leave it short and sweet so it’s easy to remember (and pronounce!)
- Want to include your name? Perfect, you can add your product too, just like in ‘JennaDigitalPlanners’
- You can craft your shop name based on words that describe what you do, like ‘ClassyPlanners’, ‘TrendyPages’, and ‘ChicCanvas’.
- Don’t use commercial names or common names. You want to avoid copyright issues at all costs!
- You can make up to five shop name modifications (if you still need to modify your name, you’ll need to contact support)
- These are some successful digital planner Etsy shops to get inspiration from: ‘PhenixDigital’, ‘CreativeDreamersCo’, ‘DestinyPages’, ‘ArtDesignCollection’, ‘HappyDownloads’
- If you still need more ideas, you can utilize ChatGPT using the following prompt: ‘Create x name ideas for a brand selling [insert your niche] digital planners’.
Filling Listing Details
Done with the name? Now Etsy will ask you to create the actual listing.
A listing consists of different sections:
– Photos of your digital planner
– A video of your digital planner
– Title, Category, Tags, and Description.
– Pricing
Uploading Your Photos
When making your first listing, Etsy will ask you to upload a primary photo and eight secondary photos of your digital planner.
Your primary photo will be the thumbnail of your product; it’s the first thing customers see when scrolling through search results on Etsy, so be sure to create an eye-catching image that makes them click on your listing!
In order to do that, search for your niche planner on Etsy’s search bar and study the first listings that pop up.
How do they look?
What do they feature?
Use this checklist to create scroll-stoping Etsy listing thumbnails:
- Analyze what colors are being used in search results and choose an eye-catching color that makes your planner stand out (bright colors work better).
- Use a mockup: you can use the mockup of an iPad to showcase your digital planner.
- Image size: 2700 pixels wide and 2025 pixels tall; aspect ratio of 4:3; resolution: at least 72 PPI.
- Include keywords and text from your description: some customers won’t read your description so leverage the images to educate potential customers on what your planner includes.
- Showcase the different sections of your planner and tell your customers which planner sizes and themes you offer. If you offer stickers or different cover customization options along with your planner, show them too!
Let’s analyze the following example: a digital nursing school planner sold on Etsy by JdmaNursingSchool.
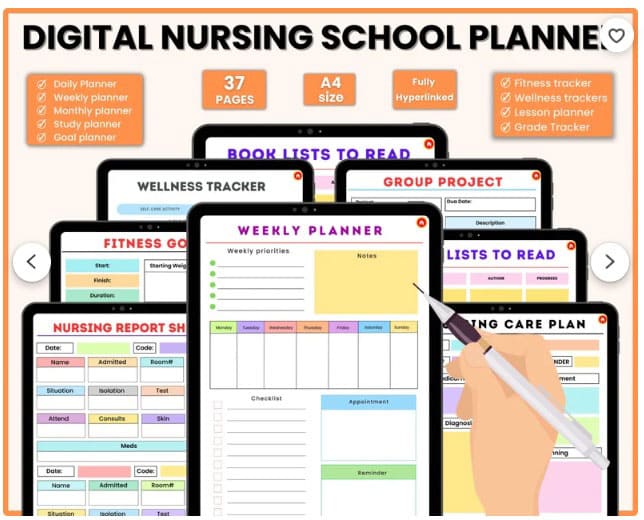
In this thumbnail, we see that the seller puts a big title, which is the primary targeted keyword.
This makes it clear to the customers what the product is about.
Below the title, there are several mockups of iPads showing the different sections of the planner.
This is strategic because these not only allow the customers to get a feel of what the product would look like in real life, but also fill the available space in the image giving the feeling that the planner has A LOT of content.
The seller uses the rest of the space available in the image to give more information about the product, like the size, the number of pages, if it is hyperlinked, and the sections included.
In the secondary images below, the seller even goes deeper and shows more sections of the planner and invites the customer to visit the shop to get special discounts.
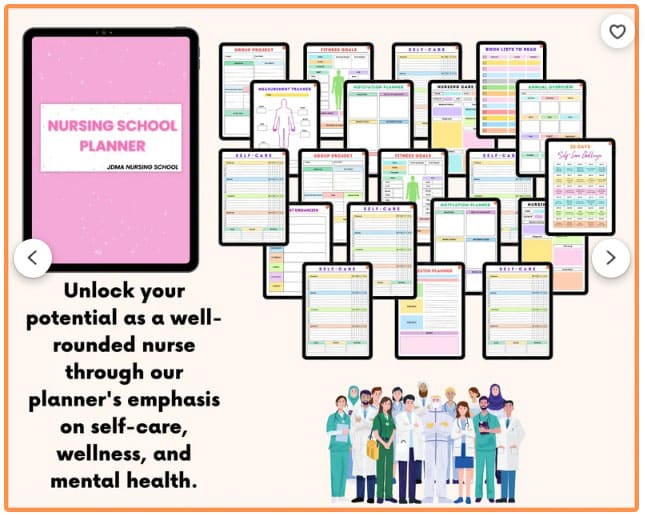
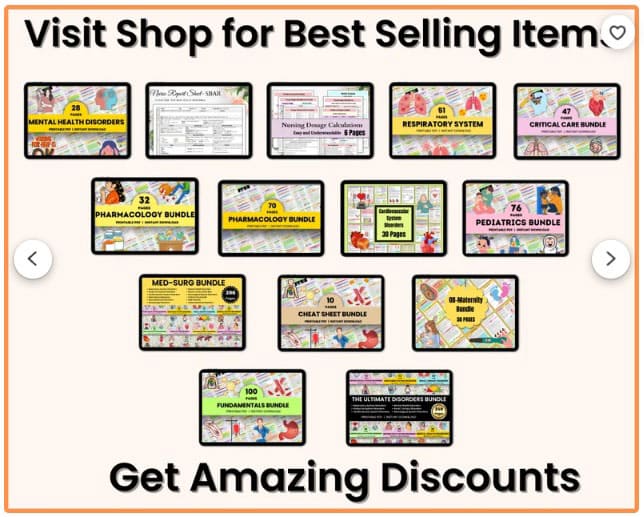
You can perfectly make these images on Canva, using the mockups offered in the platform.
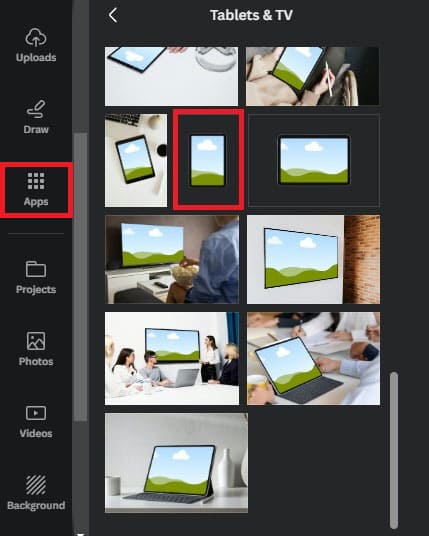
To access them, go to Canva ► Apps ► Mockups ► Tablets & TV and select the iPad mockup. Then fill it dragging and dropping the image of your digital planner.
Uploading A Video
Uploading a video of your digital planner is not mandatory but is highly recommended, given the fact that sellers who include one sell twice as much as listings that only include photos.
Here are the top three types of video buyers make when selling digital planners:
1. A video of you using the digital planner, scrolling through the pages, using the hyperlinks, etc. (example here).
2. A screen recording showing the different sections of the planner, inside an iPad mockup (example here).
3. All the secondary images joined together with a simple transition (example here).
Title, Category, Tags, And Description
Now it’s time to fill in the details of your listing.
In all sections of your listings, which are Title, Category, Tags, and Description, you want to include as many DIFFERENT keywords as possible, always avoiding using the same phrases.
In the Title, you want to include several phrases that customers would input in the search bar when looking for your planner on Etsy.
So a good title for a travel planner would be ‘Vacation Planner Trip Planner Travel Planner Holiday Planner For GoodNotes Planner For Travel’ (use all characters available!)
In Category, choose ‘Planner Templates’.
In Tags, keep adding keywords without repeating those used in the title.
If we use the travel planner example, in tags you could use the following keywords ‘travel itinerary’, ‘minimalist planner’, ‘vacation diary’, ‘digital notebook’, ‘iPad’, ‘packing list’, and ‘travel journal’. Use the 13 tags available.
As for the Description, you want to be as detailed as possible, highlighting how the planner solves customers’ pain points.
You can include all the points appearing in your listing’s photos, describing them in detail.
Here are some ideas to include in the description section of your listing:
- A short introduction of your product. How is it going to solve your customers’ lives?
- What does it include?
- What apps was it designed to be used for?
- Can colors and fonts be changed? Are images included?
- Is it for personal use only?
- Make it clear that your planner is a digital file (so no physical item will be shipped to the customer) and that it is not eligible for returns or exchanges.
- How is it used?
- How can customers import it into their apps?
Pricing
Now let’s talk about money matters.
Digital planners on Etsy range between $3 to $20.
This price varies according to how complete and complex the planner is.
For example, a 10-page daily planner would be cheaper than a full-fledged travel bundle containing Excel formulas and hyperlinking.
What you can do is see what others are charging for a similar product, set your price according to the perceived value of your planner, and calculate Etsy fees to get an idea of the profit you’ll make.
Just don’t under or overprice it: extremes are always bad!
After setting your price, don’t forget to upload your digital files to finish your listing.
Etsy will then ask you to set how you’ll be paid and activate the two-factor authentication for security reasons.
And that’s it! Your shop will be ready to be promoted and start attracting new customers.
Get As Many Eyeballs As Possible On Your Planner
Now it’s the most important part of selling your digital planners!: promoting your Etsy shop.
You see, when you launch your Etsy shop, your work doesn’t finish there!
Marketing your products is probably the most crucial step of selling on Etsy.
Yes, Etsy will do its magic with the SEO you implemented on your listings, but you MUST promote your planners on other platforms to get as many eyeballs on them.
To get started, promote your planners on Pinterest and Instagram.
Go to Pinterest.com and open a Business Account.
Having a Business Account will allow you to analyze which pins are working and which are not and see how many viewers are actually clicking on your pins.
1. To get started, go to business.pinterest.com and click on ‘Sign up’.
2. Then just follow the easy steps to create your account in a few seconds.
3. Go to profile, add your cover and logo.
4. In your ‘About’ section, describe what your account is about using keywords. In this case, you could write something like ‘Your go-to place to shop that-girl planners, travel planners, wedding journals, nursery school planners, monthly planners, and daily to-do lists! Visit my shop: [insert link]’
5. Create your first boards: boards are a collection of related pins and they help you maintain your pins organized under specific categories. For example, if you designed 10 minimalist planners, you can create a board called ‘Minimalist Planners’. Create as many boards as you deem necessary to host all your planners.
Creating a board is very easy! Go to your profile, click on the ‘Plus’ button, and then ‘Board’.
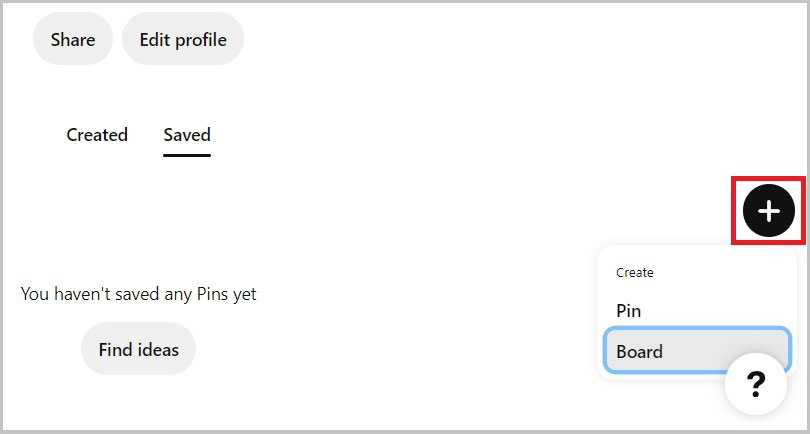
Then name it with your keyword and hit ‘Create’.
Pinterest will ask you to save some pins to your board: you can save some unless and until they are complementary to your pins rather than competitive.
Finally, add a description to your board. You can do this by going to your board and clicking on the three dots next to the name and then hitting ‘Edit board’.
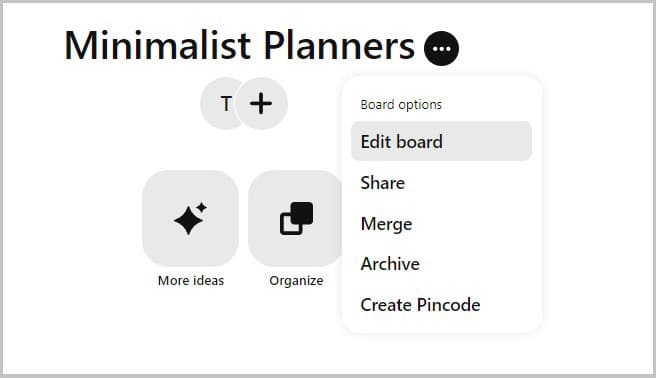
In the description, you want to add more keywords related to the primary keyword.
You can write something like ‘This board is all about minimalist planner ideas, minimalist planner layout, minimalist planner cover, minimalist planner printable, and minimalist planner stickers.’
Now you may be wondering: ‘Where can I find all these keyword ideas?’
In fact, it’s pretty easy; you can find them by utilizing the auto-complete feature on Pinterest’s search bar:
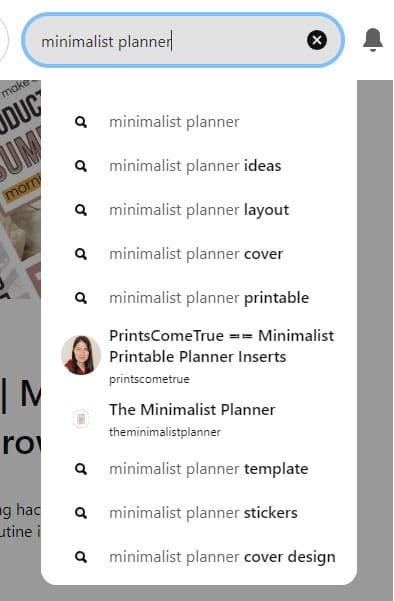
6. Now it’s time to add your first pins!
To design your pins I recommend Canva.
Go to Canva and click on Create a design ► Pinterest Pin (1000 x 1500 px).
To design your pin you can get inspiration by inputting your keyword in Pinterest’s search bar and see what’s working and what’s not.
For example, you can write ‘minimalist planner printable’ and how search results look.
What colors do they have? Do they include mockups? What do they say?
Then you can create a similar pin with your own personal twist.
Next, upload your first pin to the Pinterest board you created.
Go to your board and click on the ‘Plus‘ button ► ‘Pin‘.
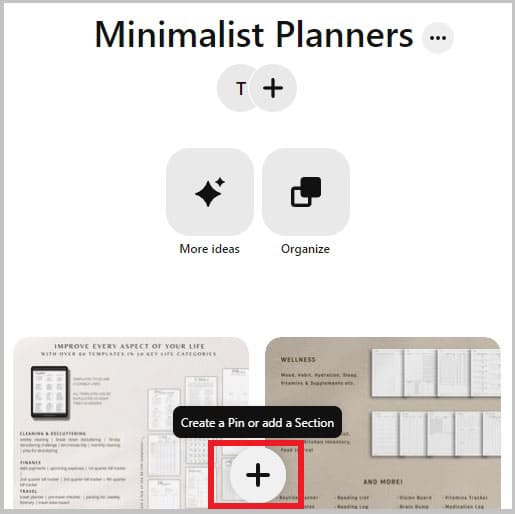
Upload your pin and add a title, a description, and the link to the Etsy listing.
In the title and the description, you want to add as many keywords as possible.
For example, a good title for a minimalist planner printable would be four to five keywords separated by a vertical bar, such as ‘Minimalist Planner Printable | Weekly Schedule | Daily To Do List | Simple Habit Tracker’.
You can use the keywords chosen for the Etsy title of your planner and see if they are searched for in Pinterest by using the auto-complete feature in Pinterest’s search bar.
For the description, you can use the primary keyword and related keywords. For the example of the Minimalist Planner Printable, you could write something like:
‘Are you looking for a minimalist planner printable that is both simple and chic? This monthly planner and habit tracker helps you stay productive and it includes digital planner stickers that make this boho planner aesthetic and fun to use. Go check it out!’.
Then, include the link to the listing on Etsy and hit ‘Publish’ or schedule the pin for another day. It’s that easy!
Keep adding a pin every day to your boards and remain consistent to start seeing results.
In Instagram, you also want to create a business account to analyze reach and engagement.
You are going to do this by creating a personal account and then switching to a business account by clicking on the three lines on the right side of your profile ► Settings ► Account ► Switch to professional account.
Now, you may be wondering: ‘What the heck can I publish on Instagram??’
Well, Instagram is so different from Pinterest! Here, you want to create reels showcasing your products.
Remember that Instagram is VERY visual. People are obsessed with aesthetic productivity, so leverage that and share reels of you using each section of your digital planner!
You can share how you organize yourself for the week, how you tick off tasks on your to-do lists, how you use your journal and your stickers, etc.
Here are some tips to grow and get on Instagram:
- Focus on value-packed reels.
- Show behind-the-scenes footage.
- Explain how to use your planners.
- Always include a CTA (call to action) in your captions.
- Study the best-performing content and create more of that.
- Be consistent. Without consistency, you won’t see results.
Start An E-mail List
It’s okay to post on social media, but if Pinterest and Instagram shut down forever, you would lose all your customers.
To avoid this, I recommend starting an e-mail list right from the very beginning.
Having an e-mail list is a fantastic way of communicating directly to your customers, without the risk of losing them all overnight.
To start getting subscribers to your newsletter, offer a freebie, like a free daily planner or something that is closely related to your niche product for free.
Now, with so many e-mail marketing platforms, which one could you choose?
Converkit is by far my favorite e-mail marketing platform and is free for up to 1,000 subscribers, so it’s great to get started!
Sign up in Converkit, then click on Grow ► Landing Pages & Forms ► Create a landing page.
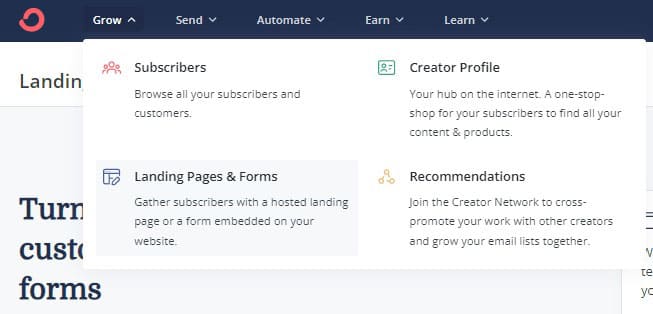
Choose a landing page to customize, change text, colors, and image.
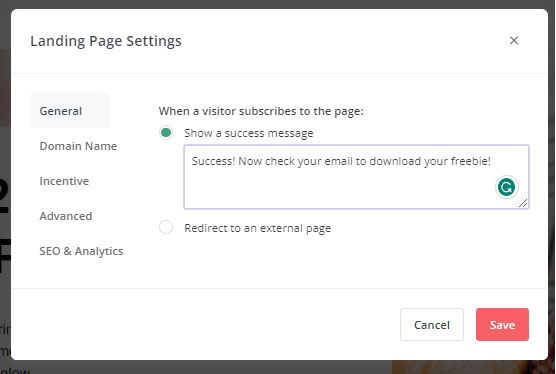
In Settings ► General, replace the success message with something like ‘Success! Now check your email to download your freebie!’ or whatever message you consider appropriate.
In Incentive, tick the box ‘Send incentive email‘, click on Download, upload your freebie and save the changes.
And that’s it; now you can hit Save and Publish. Then copy the link of the landing page to share on your Instagram bio.
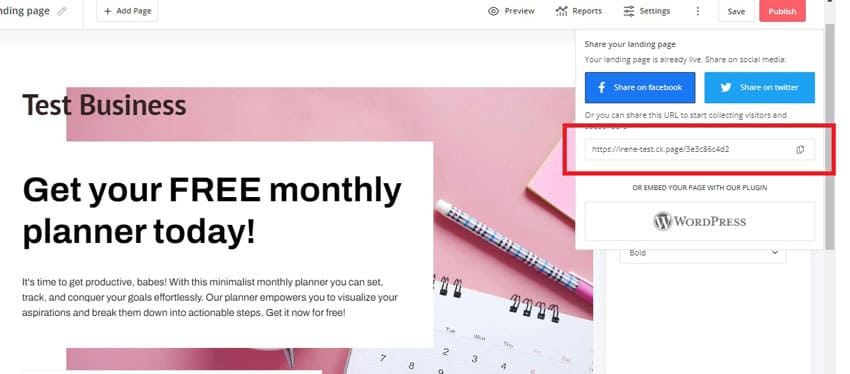
But don’t publish it as is in your IG bio. First, you’ll need to use a link-in-bio tool like Linktree.
Go to Linktr.ee and claim your Linktree just as in this image:
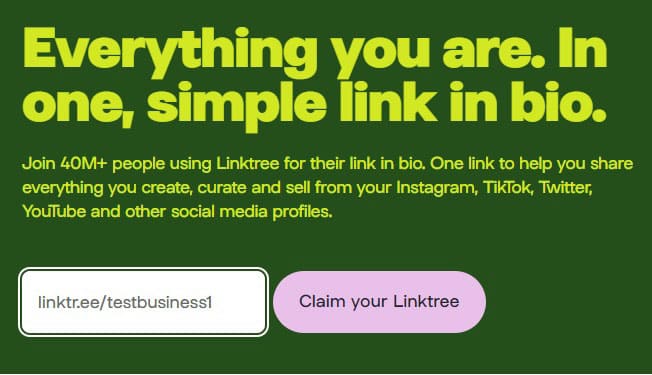
Then sign up for free, choose the free plan, and hit the Join for free button.
Following, verify your account, choose the appearance of your Linktree, and upload a profile picture. Click on Continue.
Skip adding a link to Instagram, YouTube, Facebook, and X and hit the ‘Add link‘ button in your dashboard.
Here you’ll add the link provided by ConvertKit when you created your landing page.
Add it and change the name of the new button you’ve just created by clicking on the pencil icon next to the name.
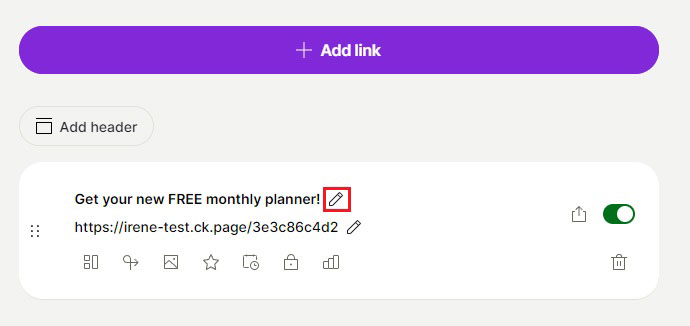
Don’t forget to add a new button for your Etsy shop and your Pinterest profile if you have one!
Now that your Linktree is ready, it’s time to add it to your Instagram bio.
To do that, in your dashboard, click on Share ► Add to your socials ► Instagram, copy the link provided, and paste it on your IG bio, into the Website field.
That’s it! Now you can start getting subscribers to your e-mail list and communicate with them about special discounts and important news about your shop 😎.
To send a new email to your subscribers, you just need to go to Send ► Broadcasts ► New broadcast, write your message ► Continue ► All subscribers, and send them the email.
FAQs: How To Sell Digital Planners On Etsy
Is Selling Digital Planners Profitable?
Yes, selling digital planners is highly profitable.
The digital planner industry is booming and more and more sellers are taking advantage of the demand for productivity products to earn extra money passively.
The best part is that to make it big selling digital planners on Etsy you only need a computer and basic designing skills to generate beautiful planners that sell over and over again, without the logistical costs associated with physical products.

The market of digital planners is saturated, yes, but you can succeed if you focus on serving an untapped niche and if you have a unique selling point, i.e. what sets you apart from your competitors.
Promotion and SEO are also key points to consider and work on to have a profitable career selling digital planners on Etsy.
Do People Buy Digital Planners On Etsy?
Yes, people do buy digital planners on Etsy, with peaks of sales between December and February, which are the months when people are more eager to set new goals for the new year ahead.
What’s more, during 2023, 86,711 people on average searched for digital planners on Etsy per month, so the demand for this product is insane!
And with so many types of digital planners, you’ll have multiple opportunities to explore and design planners that meet the needs of your particular target audience.
Why Sell Digital Planners On Etsy?
The reason to sell digital planners on Etsy is that you can make one and sell it over and over again, keeping more than 70% of your profit.

And it gets even better!: you won’t have to deal with logistical costs or exchanges and returns because the product is digital and it is simply not eligible for cancellations or refunds. Just make sure to set up this policy in the product’s description and in the policy section of your Etsy shop.
If you want to make between $50 and $5,000 per month (or $9,500 like Rachel Jimenez), then selling digital planners on Etsy might be for you!
How Do You Structure A Digital Planner?
The way you structure a digital planner depends on the type of planner you want to design.
With so many niches, the structure varies enormously.
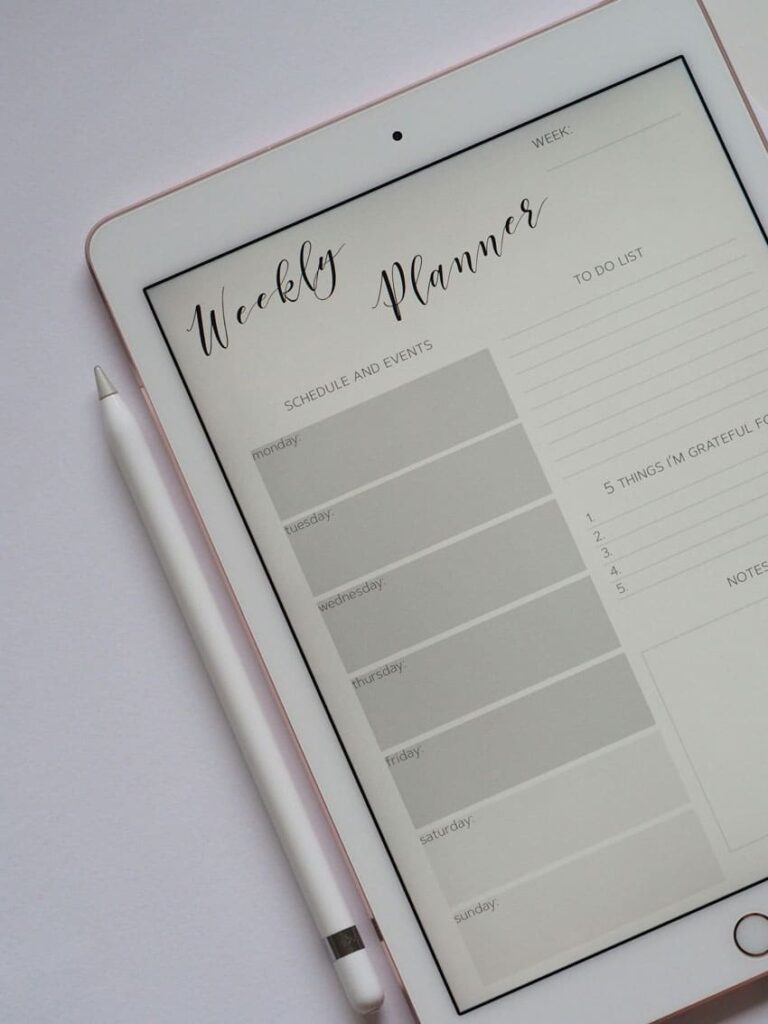
There are planners for almost any activity and style: boho planners, nursery school planners, trip planners, student digital planners, ADHD planners, anime planners, you name it, so it’s almost impossible to set a definite structure for your next downloadable product.
To structure your planner, put yourself in your customer’s shoes and ask yourself: ‘How can I organize and design this planner so it’s the best planner on the market?’.
By doing this and studying the market, you can come up with a planner structure that solves the pain points of your customers while leveraging your competitors’ weaknesses and gaps.
How Many Pages Should A Digital Planner Have?

Again, the number of pages of a digital planner depends on the type of digital planner you want to design.
To put it simply, you’ll include as many pages as necessary to come up with a planner that is complete and functional for your target audience.
For example, with a standard yearly planner, it’s just impractical to design a planner with less than 365 pages.
It even can feature more pages to include other sections like a habit tracker or notes, so there’s no need to get anxious about this. Just include as many pages as necessary.
RELATED POSTS:
- How To Get Your First Sale On Etsy With +30 Amazing Tips And Tricks
- How To Sell Candles On Etsy 2024 [And Quit Your 9-5 Job!]
- How To Sell Low Content Books On Etsy [The Laziest Way]
Wrapping Up: How To Sell Digital Planners On Etsy
So there you have it!
This blog was all about how to sell digital planners on Etsy.
Now it’s time to apply all these tips, work hard, and start making money passively.

DON’T FORGET TO SHARE AND PIN THIS POST:


Leave a Reply